Pandas >> 3 Ways to Show Your Pandas DataFrame as a Pretty Table
Table of Contents
In this article, we will share 3 ways to show Pandas DataFrame as a more pretty table in VS Code Notebook with you.
Background and Preparation
In our daily work such as data analysis, we often use notebooks to write codes and observe the execution results.
For example, DataFrame data is displayed as a table in the notebook, but only with some simple styles.
Here we would like to explain 3 ways to display the table in a more pretty style for you.
Firstly, let’s prepare the data.
import pandas as pd

df  = pd.DataFrame([
        ["1001", "John", "M", 63],
        ["1002", "Jane", "F", 85],
        ["1003", "Sarah", "M", 80],
        ["1004", "Jessica", "F", 78],
        ["1005", "Bob", "M", 75],
        ["1006", "Mike", "M", 88],
    ],
    columns=["id", "name", "gender", "score"])
df
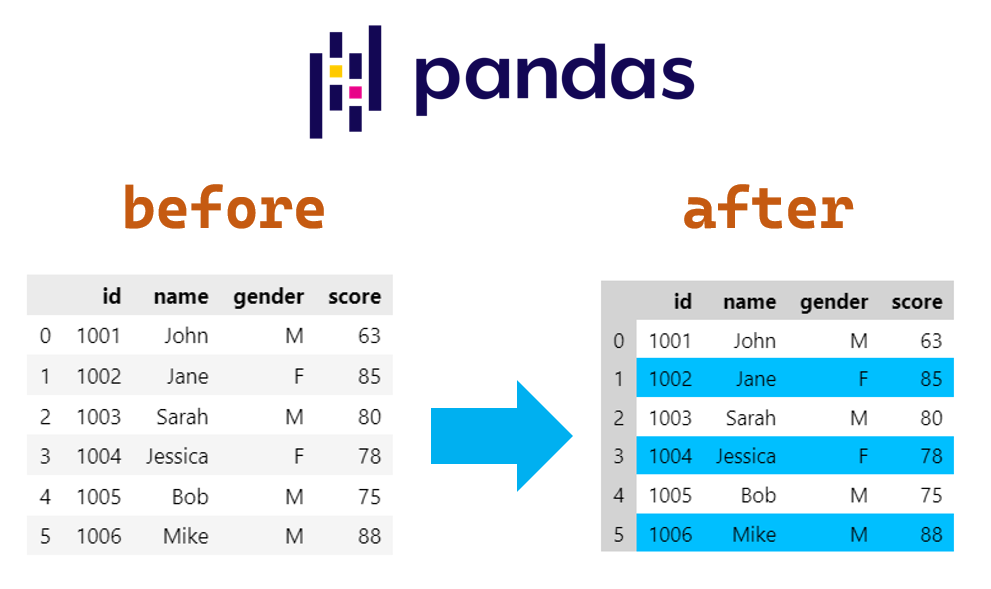
As you can see, the displayed table does not have much style.

We can use the striped row style (alternate row color) to increase the visibility of the table.
Prerequisites:
- Pandas >= 1.2.0
- Jupyter Notebook (VS Code)
Way 1: Styler.set_table_styles()
From pandas 1.2.0, we can use the Styler.set_table_styles() to customize the styles of the table.
Firstly, let’s define the alternate row color.
Let’s keep the background colors of odd rows unchanged (white), and set the background colors of even rows to deepskyblue (#00bfff).
EVEN_ROW_COLOR = "#00BFFF"
Next, use the Styler.set_table_styles() to customize the styles.
df.style.set_table_styles(
    [
        {
            'selector': 'th',
            'props': [('background-color', 'lightgray')]
        },
        {
            'selector': 'tbody tr:nth-child(even)',
            'props': [('background-color', EVEN_ROW_COLOR)]
        }
    ]
)

pandas.io.formats.style.Styler.set_table_styles
https://pandas.pydata.org/docs/reference/api/pandas.io.formats.style.Styler.set_table_styles.html
Let’s explain the parameter structure in detail.
The parameter of set_table_styles() is a list of CSS selecotrs and property settings.
{
    'selector': 'th',  # CSS selector of table header (row index and column header)
    'props': [('background-color', 'lightgray')]  # set the background color to light gray
},
{
    'selector': 'tbody tr:nth-child(even)',  # CSS selector of even rows
    'props': [('background-color', EVEN_ROW_COLOR)]  # set tthe background color to deepskyblue (#00bfff)
}

Way 2: IPython HTML
The Jupyter Notebook is formerly known as the IPython Notebook.
We can use the HTML object in IPython to show the customized HTML source.
The basic idea is to define the customized CSS style and generate the HTML source using the to_html() method of DataFrame.
from IPython.display import HTML

HTML('''
        <style>
            .df th { background-color: lightgray; }
            .df tbody tr:nth-child(even) { background-color: #00BFFF; }
        </style>
     '''
     + df.to_html(classes="df")
    )
The result is the same as above.

Let’s see the generated HTML source.
'''
<style>
    .df th { background-color: lightgray; }
    .df tbody tr:nth-child(even) { background-color: #00BFFF; }
</style>
''' + df.to_html(classes="df")
👇
<style>
    .df th { background-color: lightgray; }
    .df tbody tr:nth-child(even) { background-color: #00BFFF; }
</style>
<table border="1" class="dataframe df">
  <thead>
    <tr style="text-align: right;">
      <th></th>
      <th>id</th>
      <th>name</th>
      <th>gender</th>
      <th>score</th>
    </tr>
  </thead>
  <tbody>
    <tr>
      <th>0</th>
      <td>1001</td>
      <td>John</td>
      <td>M</td>
      <td>63</td>
    </tr>
    <tr>
      <th>1</th>
      <td>1002</td>
      <td>Jane</td>
      <td>F</td>
      <td>85</td>
    </tr>
    <tr>
      <th>2</th>
      <td>1003</td>
      <td>Sarah</td>
      <td>M</td>
      <td>80</td>
    </tr>
    <tr>
      <th>3</th>
      <td>1004</td>
      <td>Jessica</td>
      <td>F</td>
      <td>78</td>
    </tr>
    <tr>
      <th>4</th>
      <td>1005</td>
      <td>Bob</td>
      <td>M</td>
      <td>75</td>
    </tr>
    <tr>
      <th>5</th>
      <td>1006</td>
      <td>Mike</td>
      <td>M</td>
      <td>88</td>
    </tr>
  </tbody>
</table>
The ‘df’ style is applied to the table in the source below.
<table border="1" class="dataframe df">
Way 3: Using plotly library
We can also use the plotly library to display the table.
For Jupyter Notebook you can install plotly as follows.
pip install "notebook>=5.3" "ipywidgets>=7.5"
Jupyter Notebook Support
https://plotly.com/python/getting-started/
The implementation code is as follows.
import plotly.graph_objects as go

headerColor = 'lightgray'
rowEvenColor = EVEN_ROW_COLOR
rowOddColor = 'white'

fig = go.Figure(data=[go.Table(
  header=dict(
    values=[f'<b>{col_name}</b>' for col_name in df.columns],
    # line_color='black',
    fill_color=headerColor,
    align=['left'],
    font=dict(color='black', size=12)
  ),
  cells=dict(
    values=[
      df["id"],
      df["name"],
      df["gender"],
      df["score"],
    ],
    # line_color='black',
    # 2 dimensional list
    fill_color = [[ rowOddColor if i % 2==0 else rowEvenColor for i in range(len(df))] * len(df.columns)],
    align = ['left'],
    font = dict(color = 'black', size = 11)
    ))
])

fig.update_layout(width=500, height=500)
fig.show()
The result is a bit different from the above results.
The row index is not shown and the text in the table can not be copied.
But the columns are draggable and can be re-ordered.

Let’s explain the code in detail.
In the constructor of the Table, header and cells are set separately.
They are all dictionary type data.
- values: contents to be displayed
- line_color: the line color of the table, no lines if not be set
- fill_color: background-color
- align: alignment setting
- font: font-style setting such as color, size
If we want to emphasize the content, we can use <b></b> to make the font bold as follows.
f'<b>{col_name}</b>'
We need to specify the fill color for each cell.
The order is to specify the color for each cell in a column first and repeat it the column number times.
specify the color for each cell in a column
[ rowOddColor if i % 2==0 else rowEvenColor for i in range(len(df))]
repeat the above settings N times (N: the number of columns)
* len(df.columns)
Conclusion
We made our table more pretty in the three ways below.
- Using pandas built-in Styler.set_table_styles()
- Using HTML object in IPython and generated HTML source
- Using plotly library
References
pandas.io.formats.style.Styler.set_table_styles
https://pandas.pydata.org/docs/reference/api/pandas.io.formats.style.Styler.set_table_styles.html
python3 + Pandas styles + Change alternate row color
https://stackoverflow.com/questions/42576491/python3-pandas-styles-change-alternate-row-color/42639858#42639858
plotly: Alternating Row Colors
https://plotly.com/python/table/